Tutorial: Using the FREE built in image uploader "servimg"
Page 1 of 1
 Tutorial: Using the FREE built in image uploader "servimg"
Tutorial Servimg.com
This little tutorial will help you to better understand the functionality of this service and attempt to answer your questions.
Servimg is an FREE image host as there are others on the Net. It can host images of maximum size 2MB formats, bmp, gif, png, jpg and tif. A tool has been developed to create an account on Servimg from this forum. This tool creates an account using the mail and password you use on the forum. There is no risk with security and you can use this tool without fear.
The best part is that it's FREE with no limit on the amount of photos you upload.
Step 1: When creating a new topic or reply to a topic you will see the text editor. This is where you can change your font size, add an image, link, video etc...
Look for this icon and click it >>>>>
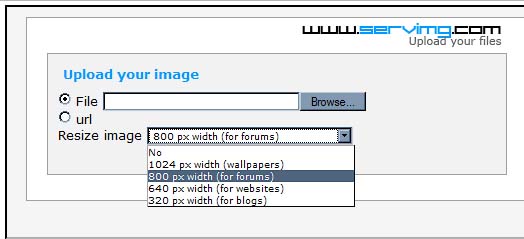
Step 2: When the window opens you need to check either File (if the file is on your computer) or URL (if the image is located on a website or another hosting account) You will also see a drop down box so that you can choose which image size you would like. See photo below:
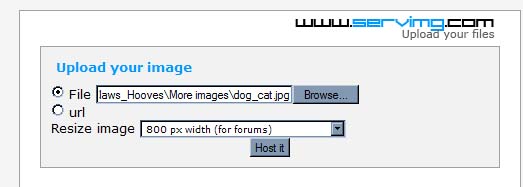
Step 3: After you have chosen your image and size click the the window should look something like this and you should click the "Host It" button.:
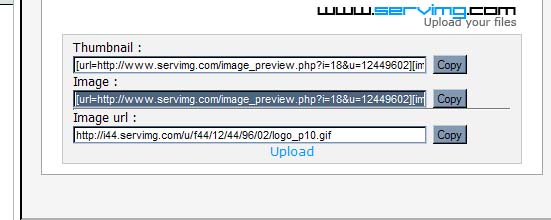
Step 4: The next window will open where you can copy and paste the code into your message.
You have three choices:
Thumbnail - This will add a small thumbnail of your photo to your message which links to the larger image.
Image - This will add the full size image to your post.
Image URL - This is the location of your image. (You can use this code if you wish to then use BBcode to link your image by other means by using the image icon or link icon).
Choose "Image" to place the full size photo in your post.
*Firefox browsers will need to right click and copy/paste the code*
This what the window should look like:
Step 5: Place your mouse where you want the photo to appear and paste the code into your message.
It will look like this:
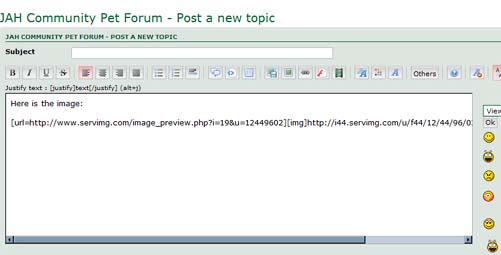
Preview your message and you should see the photo you inserted. If everything looks the way you want it to, click "Send" and your done!
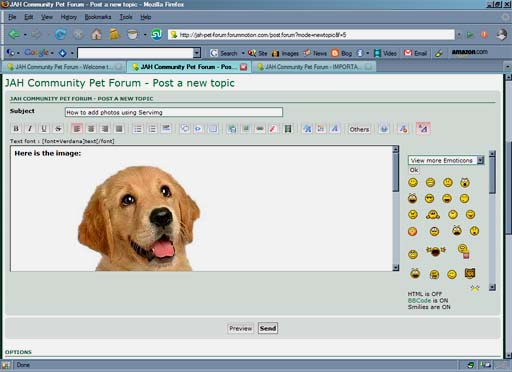
How to use the Image URL to insert a photo
Step 1: Follow steps 1-4
Step 2: Copy the code for "Image URL" (Firefox use right click to copy)
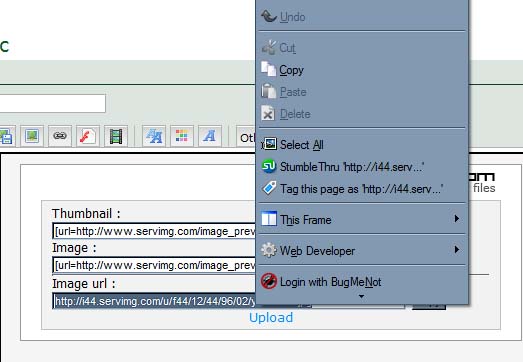
Step 3: Click the insert image icon and paste the URL into the box and click "OK":
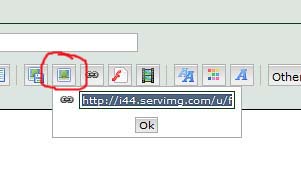
That's it! Preview your post and if you like the way it looks, click "Send".
We have set up a Testing Area to practice if you are new to posting to a forum.
If you have any problems or questions just reply to this post.
This little tutorial will help you to better understand the functionality of this service and attempt to answer your questions.

Servimg is an FREE image host as there are others on the Net. It can host images of maximum size 2MB formats, bmp, gif, png, jpg and tif. A tool has been developed to create an account on Servimg from this forum. This tool creates an account using the mail and password you use on the forum. There is no risk with security and you can use this tool without fear.
The best part is that it's FREE with no limit on the amount of photos you upload.

Step 1: When creating a new topic or reply to a topic you will see the text editor. This is where you can change your font size, add an image, link, video etc...
Look for this icon and click it >>>>>

Step 2: When the window opens you need to check either File (if the file is on your computer) or URL (if the image is located on a website or another hosting account) You will also see a drop down box so that you can choose which image size you would like. See photo below:

Step 3: After you have chosen your image and size click the the window should look something like this and you should click the "Host It" button.:

Step 4: The next window will open where you can copy and paste the code into your message.
You have three choices:
Thumbnail - This will add a small thumbnail of your photo to your message which links to the larger image.
Image - This will add the full size image to your post.
Image URL - This is the location of your image. (You can use this code if you wish to then use BBcode to link your image by other means by using the image icon or link icon).
Choose "Image" to place the full size photo in your post.
*Firefox browsers will need to right click and copy/paste the code*
This what the window should look like:

Step 5: Place your mouse where you want the photo to appear and paste the code into your message.
It will look like this:

Preview your message and you should see the photo you inserted. If everything looks the way you want it to, click "Send" and your done!

How to use the Image URL to insert a photo
Step 1: Follow steps 1-4
Step 2: Copy the code for "Image URL" (Firefox use right click to copy)

Step 3: Click the insert image icon and paste the URL into the box and click "OK":

That's it! Preview your post and if you like the way it looks, click "Send".
We have set up a Testing Area to practice if you are new to posting to a forum.
If you have any problems or questions just reply to this post.

 Similar topics
» Recovery Tips - "I Found a Stray Pet"
» First 100 members will receive FREE puppy or kitten food!
» Grain-Free Dry Dog Foods
» Free - Female Rottweiler
» Puppy free to good home
» First 100 members will receive FREE puppy or kitten food!
» Grain-Free Dry Dog Foods
» Free - Female Rottweiler
» Puppy free to good home
Page 1 of 1
Permissions in this forum:
You cannot reply to topics in this forum


